Wednesday, December 21, 2011

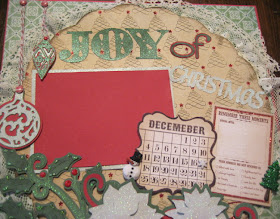
Joy of Christmas Layout


Hello ladies...well in the process of getting everything else done for christmas , I managed to get a layout done. I bought some new christmas DCWV paper and wanted to give it a try...I also bought some graphic 45 paper....love it.


I used my design studio to weld the title "christmas"....so I am not sure on sizes but I used Jasmine, teardrop and cindy loo for the title " JOY of Christmas"...I am actually going to add a picture from my mom and dad's party which we had last saturday....we always do there's early so we are not rushing through everyone else we have to see....

I used Christmas / Noel for the ornaments, poinsietta and the holly berry.


I used tim holtz walnut stain to ink everything...I also used Cindyloo cart for the big scallop...

I added lace, baker's twine, brads, snowman and tree button, glitter paper for the poinsietta's, and a snowflake button for the date on the calendar....used twinkle glitter on the holly berry and added some red bubble paint. Hope you enjoy and I am wishing everyone a Merry Christmas if I don't make it back here before then.

Thursday, December 1, 2011

ELF ON A SHELF!!!


Hello again...I am not sure how many of you ladies know about ELF on a shelf....well if you don't It is one of the best inventions to do with your kids at this time of year. My daughter did this in preschool a few years ago and loved it. So When I was at Kirklands a few weeks ago I found this elf and had to buy it.

It usually comes with a book and elf (which you can buy at Target for $30.00) I just bought the elf for $7.00....You tell your youngsters that there is an elf that watches to see if they are being naughty or nice through the month of December..some kids might get scared about that...just insure them that it looks and feels like a stuffed animal but at night she or he comes to life and goes back to the northpole to let santa know if he or she (your kid) has been good or bad. Then in the mornings returns in a different spot. This is the 1st year I started this at home and My daughter loves it already...she got to name the Elf which she named Jinglebells...I got her a girl elf. There were boys. You can get what you want.


Anyway...I asked my daughter to get her bath, brush her teeth and pick up toys yesterday and I never got a "NO".....She is 6 and very good but sometimes doesn't want to do what she is told...just like any child.

I hate lying about Santa and making up a pretend elf...but she really believes! When she is older I will tell her but for now I am enjoying the magic in her eyes and in her heart...I hope you all enjoy.

Warm Wishes to you!


Hello ladies...This is my last christmas card for today. Very simple ...but I love how it turned out.

I think I used Christmas / noel for the cup...Pddu for the spoon and the swirl also came with the cup.

I cut 1" squares and glued them to a black background to make it pop. Inside is a stamp that says warm holiday wishes.....told you it was simple...enjoy your day!

Stockings were hung!


Hello again...getting sick of all my christmas cards..LOL.well I only have a few more left. I always try to make them all different, can't see making 50 of the same card..to boring for me...hehe. This one I really enjoyed making...

Used JOTS to make the stockings cut @ 2"

Bakers twine, ms border punch, inkadinkado stamp (inside), DCWV holiday collections which I got a few days ago. Used gold and white gel pens.

Thanks for stopping by.

Another christmas card...A wreath with pearls.


Thank you for stopping by...I am showing some of my christmas cards that I made...I want to show all of them so that I can send them out soon....it is the 1st of December and It will be Christmas before we know it.

I think this turned out great...This wreath is a ms wreath punch...very simple to use. I added some pearls and added a red bow (which also punches out with the wreath)...I doodled with white gel pen on the bow.

Added scalloped edge borders with the ms border punch.

Also added bakers twine. Last but not least a scalloped doily inked in red.

Gift of Christmas


This is my 2nd post for today...I have made a few of these cards in the past...thanks to one of blogger friends..she knows who she is. On this one I added a ponsettia...cut @ 3" with winter woodland (3 layers)

Used scraps, button, hempcord, and glitter twinkle....I hope you enjoy..thanks for stopping by.

Let it snow


Hello ladies....It is alittle warmer day, yesterday was snowy and rainy and just cold. I'm not complaining since we have had good weather. Sorry I haven't been on lately, I have been getting christmas cards, decorating, shopping, wrapping, all things ready for Christmas to arrive...been really busy. Anyway, I got alot of christmas cards done and wanted to share in a few posts.....


This one is Let it snow...I used these cute snowman from the Woodland Christmas cart...sorry I don't remember sizes....wrote let it snow with a blue and white gel pen, Added jewels, used a snowflake border punch...can't see to well and sorry for the picture..lighting was crappy. Doodled with white gel pen.

I hope everyone has a great day.

Wednesday, November 23, 2011

Snowman couple.


Hello ladies...I want to start by saying Happy Thanksgiving, I know it is tomorrow but I figured everyone will be spending time with family and friends. Last week I made a turkey out of a jar...well today I made this cute couple snowmen. These are going to be some christmas gifts....I did not want to make a giftcard holder...so I made these instead. I am going to add some money to them but right now they have chocolates...everyone loves chocolate and money.


I used some ribbon to make a rosette for the boy snowman., some ribbon for the girls scarf...I found the santa hats and the carrotsticks(noses) at hobby lobby. some jinglebells for the boy. a flower and button for the girl.

Added the eyes and mouth with my black gel pen...I added a touch of stuffing to look like it is snow inside of the bellies....I think they turned out really cute..let me know what you think...Happy Thanksgiving everyone.

Tuesday, November 15, 2011

My turkey jar!


Hello ladies...I thought since it is a rainy day here I would do some crafting. I was blog hopping the other day and came across a talented lady named Patti....Here is her blog go check her out...http://pattimilazzo.blogspot.com/...She made this beautiful snowman jar (which I am going to scraplift) thanks Patti...but she gave me an idea for thanksgiving. I made one of these for my mom. We have thanksgiving with my mom and dad almost every year...for the last 3 years we didn't have a thanksgiving together , it was too hard for my parents after my brother passed...anyway along story short , this year my parents are doing thanksgiving again so I decided to make a little something. This will be for both of them plus I am going to make a wooden block family set to go along with this..hopefully I finish it in time.


Onto the jar...I bought the jar at Ikea (this weekend while christmas shopping)...

bought some wooden balls (head) painted in brown outdoor/indoor paint, added some ribbon , made my own rosette (1st time for that) pipe cleaner (gold), pearls (eyes)

feathers (tail), added some mini chocolate bars, and peanut butter reese cups.

Thank you for looking and god bless all.

Tuesday, November 8, 2011

Family made out of wood blocks / Sous challenge (LEAVES)


Hello ladies...Well Thanksgiving is right around the corner. So what better way to celebrate by making wooden blocks about Family. Family is everything to me. I love spending time with my family on the holidays. I started making this set of blocks for my mom and dad, but then I really loved how they turned out , so I am keeping them for myself and making another set. OH yeh, this is also for the SOUS challenge of LEAVES. THey want you to use a diecut of leaves....I think I did just that.


Wood from my husbands stash

Family (title) cut @ 2 1/2" in dcwv fall paper

Leaves cut @ 2" in yellow cardstock and shadowed with a bronze color. Cut with Storybook cart. Inked with tim holtz walnut stain

Fancy corner (leaf) cut @ 1 1/4" with Storybook....Those are the ones with the button glitter sunflowers.

I used ms border punch, bakers twine, ribbon, buttons, jewels, flower and some green leaves (on the Y) from my stash.

I hope you all enjoy my creation today and have a wonderful Tuesday.

Wednesday, November 2, 2011

4 different christmas cards...o christmas tree!


2nd post for today....Let me start by saying November snuck up on me...hehe. Today is my Husband and my 9 year anniversary. We've been married for 9 but been together for 16 years . I forgot to make him a card. I know I have time to still do so , but I can't think of what to make for it. This weekend we are celebrating it...so I guess I still have time. LOL. Anyway....I did however get some christmas cards made....I hope you enjoy. I love how these turned out.


Card recipe:

Trees cut @ 4" with HollyJolly Christmas cart....borrowed this one from my mom...have to get my own..hehe.

Jasmine corners cut @ 3 1/2"

ribbon, pearls, ms bubble punch, twinkle writer glitter pen...and wala four different looking cards. Enjoy.

Epcot


Hello ladies....I made this layout for a sketch challenge at stuck on u sketches....http://stuckonusketches.blogspot.com/....This layout is of my darling daughter, my niece, and my nephew at Epcot last year...they had a blast. We all did. These pics are of the beauty and the beast.

Layout recipe:

Shadow (background) flower 4 cut @ 10 3/4" (fit to page) with cindyloo cart

Flower 6 (up the side) cut @ 10 1/4" with cindy loo

EPCOT cut @ 1 1/4" with teardrop

Corners cut @ 4" with jasmine

ms border punch and ms butterfly punch, some lace, and gel pen for doodling. Hope you enjoy and thanks for stopping by.

Thursday, October 27, 2011

BIRTHDAY CARD FOR FIL!


Hello ladies..It is a cold and rainy day here...great day for crafting. I made this card for my father in law. His birthday is next week. So this was a simple one.


card recipe:

Birthday bash for the presents cut @ 3 1/4"..added pearls and the small tag reads Billy...

Used spellbinders, scrappycat stamps, ms bubble around the page punch, walnut stain by tim holtz, ribbon and hand cut the happy birthday image out.

Hope you enjoy and have a great day.

Thursday, October 20, 2011

Joy...blocks!


Hello ladies...I have been wanting to try some different ways of crafting. I used some wooden blocks that my husband had left over...and decorated them with DCWV Holiday Christmas collection cardstock.

I used mod podge, sanded the paper, inked with tim holtz walnut stain, ribbon (which you can see from the side). Embossed the banch ornaments with red and gold embossing powder.

Used twinkle glitter for the wreath, added a pearl cut wreath with Jolly Holidays @ 2 3/4"

Stocking cut @ 2 3/4" with chipboard about 3 times. This is suppose to be the J..but didn't want to use a letter....so I did the stocking as the J.

branch with ornaments (tucked behind the stocking) cut with same cartridge @ 2 3/4"

the "Y" cut @ 2 3/4" with Tear drop.


I painted the blocks with some outdoor green paint that I had left over.

Hope you enjoy...I might make some more of these as gifts....thanks for stopping by and have a wonderful chilly day.

Thursday, October 13, 2011

Lilly's birdhouse with alittle cricut.


Hello ladies....Lillian and bob (daughter and husband) made a birdhouse together. She got to hammer in some of the nails and got to drill the bird hole. She loves making things and doing things as a family. She said she wanted stars, butterflies, hearts, and flowers...so I used some vinyl (that I got on clearance for .50 a while back) so I did not mind using it.

I cut out stencils with my cricut ...george and WIMG cartridges....She got to paint them then when it dried, I did another coat...We all had our hands in making this. Thanks for stopping by and Hope you enjoyed.

Carving pumpkins.


Hello ladies....I got another fall layout done..woohoo...I really love how this turned out. This layout is of my daughter Lillian (age 4 at the time = 2 years ago) and my husband. After we went to simmons farm (which was my last layout) we carved her pumpkins the next day. As you can see the pumpkin was as big as her....love it.


I used my design studio to lay it all out.

Cindyloo for the orange background and frame (sorry did not write down the sizes again)

Birthday bash for the banner and letters which I cut out 4 times in different colors.


the black cat is a sticker from K&Company ( I added this because on her smaller pumpkin we did a cat)

Jewels, ms branch punch, white gel pen, and a strip for the pumpkin border on the bottom of the layout with the DCWV Fall glitter paper.

Added some hemp cord to the banner...and another layout done...hehe.

Thanks for stopping by. Have an awesome day!!!