Monday, February 28, 2011

Painting using my cuttlebug / pull up treats!


Hello ladies...well I have been on a roll lately plus I had to get alot done by this weekend so it pushed me to get into my craft room...glad I did though. I have been missing it. I have been trying different techniques or just ways to do something I usually don't do.

For this card / pull up treat I made this for my sister's father in law...we have 3 guy birthdays, my mom, my niece and another young gal that we are celebrating this weekend all in the same day. so This is just one of many.


I used my cb bird folder and painted it with teal and glitter white 3d paint...and some gold (looks a whole lot better in person..you can see the shine) anyway, then I rolled this through my cuttlebug. and this is what came out...cool huh? I really love the old feel of it. I then added some raffia and button.

Inside used some stamps ...says"A little bird told me it was your birthday...happy birthday"

Then for the pull up treat I used splitcoast stampers and followed the directions...very very easy. I made 3 more like these, but all different...will be posting more this week about those and some other cards to go with them.

I hope you enjoyed my card and pull up treats...and hope you give these a try. Thanks for stopping by ..don't forget to comment below or even just follow. I love to have new blogger friends.

Sunday, February 27, 2011

Stamping on a candle!


Hello ladies...This is a quick post today, I got alot done today but just wanted to show you one of the things I was working on. My mom's birthday is the 11th of March but I needed to get this done by this weekend. I have always wanted to try stamping on a candle...very easy to do and I think I will give some more of these a try. This is my 1st one that I've ever made, but Love it alot.


I did this in about 10 minutes and that is because I had to stamp the images. I got a vanilla candle $3.00 at Target.

Need waxpaper, tissue paper, stamps , candle, and markers...I found this on splitcoast stampers...can't wait to do more.


I really hope my mom loves this. I am sure she will but I always want what I give away to be perfect.


Thank you for stopping by and I hope everyone is having a great night.

Friday, February 25, 2011

Seashore / SOUS challenge sketch!


Hello ladies! I saw this sketch on STUCK ON YOU SKETCHES....http://stuckonusketches.blogspot.com/ ....I wanted to try it...I hope I am not late entering this.


I have been pretty busy lately. Today was a day where I could finish it , It has been sitting in my craft room for about 3 days,

This layout is of my daughter Lillian in Daytona Beach back in Oct 2010, she was collecting seashells by the seashore. (I used some of those shells on the layout)

I did not write down sizes, sorry! I used my design studio to lay it out.

I used LAB cart (Lifes a beach) for the seashells (tan), seashore (title), I tore paper, inked everything, added some real seashells with hot glue gun (which I burnt myself on, when using this be CAREFUL!!!!!!) Added a brad.

I also used some burlap which I painted white, added glitter and let dry! some ribbon, and wala a layout....took me a while but I finished it.

Thank you all for stopping by and I hope everyone is having a great day!

Monday, February 14, 2011

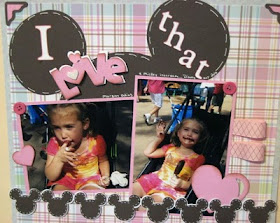
I love that face / FD challenge.


Hello ladies on this beautiful Monday morning...it is in the 50's here...it has been real cold lately and snowy so to have this beautiufl none snowy warm day really makes my morning.

I figured I would share this layout I have done for the Frosted Design challenge @ http://www.frosteddesigns.blogspot.com/....They want you to use the word love. Well I Love this face...this layout is of my niece Morgan in Disney (yeh that's right another disney layout) eating a mickey icecream....just like my daughter Lily was doing in the last layout I posted....it was all over her face....so cute..she really was enjoying that icecream. Yum!


I really love how this turned out.

Layout recipe:

Mickey Font cart ....for the mickey border used design studio to weld them together. Cut @ 1"...

Mickey head (background) cut @ 8 1/4"

Used Jasmine cart ....for the corners cut @ 4"

Used CAC (create a critter) cart for the heart cut @ 3 1/2" (comes with the little one too) I inked with antique tea dye.

Love cut @ 3" and then cut @ 2 3/4" ( the 3 " gives it a shadow)

I used PSB for the I cut @ 1 3/4", that cut @ 1 1/4", and the FACE! cut @ 1 1/2" inked.


Added some ribbon, buttons, and faux stitched on the mickey heads with a white gel pen. I also added a glitter heart to the center of the Love.

Thanks for stopping by and Have a wonderful day!

Wednesday, February 9, 2011

Stylish blog award !


Hello ladies...no layout or card today but last week I opened me email and received this blog award from Christina.....you can check out her blog @


http://christinacreativecorner.blogspot.com/


She is a very talented lady ..so thank you very much for the award...I just did not have a chance to post until today...plus I have to admit I forgot about it until I was going through my emails...better late than never , right?


Well for this award I have to write 8 things that you might not know about me....so here goes...

1.) I love to sleep in on weekends....not many chances for that though

2.) I love musketeers candy bars (yummy)

3.) I have 2 beagel dogs..brewster and princess.

4.) My daughter, hubby and I have family night on Fridays...we play board games, watch a movie, or just hang out together.

5.)I love anything seafood....especially lobster tails.

6.) I love Keywest ...my favorite destination

7.) I would love to visit California one day

8.) I love country, r&b, some rock and pop music.


Now I have to give this to 8 bloggers that I think deserve it....well that should be everyone but I can only give it too 8...so here they are...


1.)Patsy B.....http://anewcreationforyou.blogspot.com

2.)Beatriz....http://beatrizguzman58.blogspot.com

3.)Nancy....http://anothermdcrabbie.blogspot.com

4.)Jeri....http://bugnme.blogspot.com/

5.)Barb...http://barbcraft.blogspot.com

6.)Enfys...http://going-buggy.blogspot.com/2011/02/using-up-stuff.html

7.)Lisa B....http://our2angelsinheaven.blogspot.com

8.)Donna...http://donnamundinger-popsicletoes.blogspot.com

Thanks for the blog award Christina....and thanks for stopping by .

Tuesday, February 8, 2011

The sweet life!

Hello ladies...The other day I posted a pic of a beautiful lace flower...

Nanne had a tutorial on it on SOUS...you should go check it out....http://stuckonusketches.blogspot.com/2011/01/lace-rosette-tutorial.html

...these are so easy to do and you can use whatever ribbon or lace you want..really anything. Anyway...THis is a layout of my daughter Lillian in Disney in 2010 eating a mickey icecream...I love these pics of her enjoying her snack and better yet we had the quick plan service which I got free with our package so we did not have to pay for the icecream ...so this was really sweet. Well here it is..what you all been waiting for. Hehe!


Layout recipe:

Circle for back of flower cut @ 1 1/4" with psb cart

Flower Rosette = Nanne's tutorial check up above for link

pink glitter (which you can not see in these pics) on the flower and lace...sprayed with some adhesive.

The cut @ 1 1/4" with Teardrop

Sweet cut @ 1 1/2" cut with Teardrop

Life cut @ 1 1/2" with Tear drop


added ms stitched around the page border, ribbon, (made into bows) , mini roses, brad (center of flower), pink gel pen (journaling) , heart pin, safety pin, and wala a layout...very easy....Thanks for stopping by!

Monday, February 7, 2011

Altered mailboxes for the boys!


I'm back...here are the altered mailboxes for the boys.....I used red mailboxes for them...I left the ends plain. I got these mailboxes from target for $1.00..cool huh??

I found this monkey paper at michaels for .59cents, used some ribbon from my stash, cut 2 strips of green paper into 1/2" strips (so you should end up with 4 of these)...well if you are making 2 mailboxes for boys. If you scroll down to my other post for today you will see all the items you need.


I used a stamp too that says love your smile....did not want to make it to girly...but I did add some ribbon for extra dimension. I also used CAC (create a critter for the stamp (cut @ 2" twice...front and back of flag)...I think for the boys I am going to get them a matchbox car and stick that in there with some candy.

Thank you for stopping by ..and have a awesome day.

First time making altered mail boxes for the girls!


Hello ladies...well I promised yesterday I would show you the rest of the altered mailboxes...these ones are for my daughter Lily, nieces Morgan and Courtney....I showed you a sneak peak yesterday of them but these are the finished products...I think they turned out cute...This was my 1st time making these.

I used ribbon, sanding tool for the edges,recollections adhesive tape (thin), xacto knife, fancy paper of your choice, and wala....I added some candy and a pack of tinkerbell cards. I really love how these turned out...will be making more of these in the future.


Thanks for stopping by and God bless all!

Sunday, February 6, 2011

Sneak peak / Lace flower !


Hello ladies! This is my 2nd post today, I wanted to show you a sneak peek of something I am working on.....This flower was made using Nanne's tutorial on SOUS (stuck on you sketches) click on my title and it will take you too the tut from Nanne...thanks Nanne...I love these and I plan on making more of these...stay tuned for my layout in a couple days!

Looky what I am making / Frosted Designs challenge!!!!


Hello ladies...looky what I am making. Altered mailboxes for the kids(nieces, nephew and my sil's fiance's son) for valentine's day...I made their cards but I thought why not try to make these cute little mailboxes...so I did. I love how all of them turned out...this is just a sneak peak at one of them...this one is my daughter's ...she loves glitter and I think she will love it. I am going to put some candy in them...I know the kids will love that...I also made this for frosted designs challenge...I know they said red , white and pink but this one has alittle blue and puple...but I thought it would go for the challenge....go check them out @ http://www.frosteddesigns.blogspot.com/


I used a mailbox which I found at target for a dollar, some ribbon, some adhesive ( a sticky one) , sander or file, and I used CAC (create a critter) for the stamp on the flag...cut @ 1 3/4"...hope you enjoy.

Friday, February 4, 2011

Making memories....live in the moment!


Hello again ladies! I was checking some of my blogs that I follow and SOUS (stuck on u sketches has another challenge this week) Love challenges gets my mojo aflowing. Anyway, They have this sketch (1st pic) that they want us to do. I have disney layouts to do so I thought why not incorporate this sketch into my layout...and so I did. You can go visit them at http://stuckonusketches.blogspot.com/ ....they always have some cool challenges.


Layout recipe:

Accent blackout (birthday boy) on Storybook cart cut @ 8 3/4" (fit to page)....that is in the print paper on bottom.


Then I did the same thing but cut @ 2 1/2" behind live in the moment. (which is a sticker from DCWV Safari CHic stack...got this year.

All the paper is also Safari chic stack except the brown background. I just love this paper ...don't you?


making memories (title) cut @ .3/4" with Simple Sweet

Flrsh 2 cut @ 1 3/4" (leaves) the small ones with SYI

FLrsh 2 cut @ 2 1/2" under the journaling added some gold jems (you know I love my bling)


a corner sticker (from the same stash of paper)

used white gel pen for accenting the leaves and faux stitched around Live in the moment.


FLRSH 4 cut @ 2 3/4" (with tree background) and the beige did it twice (bottom of page) with SYI

Well I hope you enjoy this...and thanks for stopping by.

Happy birthday little lady!


Hello ladies...This card is for my niece Morgan. Her birthday is in a couple weeks so I made her this cute little lady bug card. She will be 4 years old. Time goes to fast.


Card recipe:

1 1/2" strips (white) used ms border punch

Lady bug cut @ 3 1/2" with Birthday Bash Kept the 4 the same size

Then I made a black shadow of the 4 cut @ 3 3/4"


USed a scallop frame cut @ 3 1/2" with B.B (birthday bash cart)

then cut @ 3 3/4" for a shadow

inside : Happy birthday little lady cut with the phrase part in Birthday bash


Fancy corners cut @ 2" with storybook cart, added 2 pearls for the eyes on the lady bug....Very simple card...


Thanks for stopping by and God bless all! Make sure you check back for a layout !

Tuesday, February 1, 2011

Dino Sliding pop up card!


Hello ladies...Well this is my 1st post for Febuary....I can't believe it is already here, where did Jan go. Oh well, Since Valentines day will be coming in a few weeks and my daughter wanted me to make her a sliding pop up card with a dino...I thought I would get on that. I found this link to splitcoast stampers which you can click on my tite and it will take you there.


CArd recipe:

Dino cut @ 3 1/2" with CAC (create a critter) one of my fav carts.

Used sizzix hearts cut out on my cuttlebug and embossed with swissdots, background too. I added a glitter heart to the middle of the card.

Added google eye to dino and some glitter gue. Added ribbon, stamped with valentine stamp and wala easy peasy!


Thank you for stopping by!