Wednesday, January 26, 2011
My 1st envelope gift box!
Hello ladies....I received an email today about this envelop gift box from splitcoast stampers...I just had to try it. I actually made 2 of these boxes. I planned on it fitting my black magic card that I made for my mom's birthday (posted yesterday), but The box was too small...this is the first pic (my 1st try) followed demensions on split coast stampers....click on title to take you to the link...
For that one I used Cuttlebug argyle folder , used finger nail file to sand it. Added white ribbon and lace, also used sizzix flower folder and crumpled the flowers. added some more lace to middle and pearl sprays, and 2 pearl pins...but then I found out the card did not fit...so I modified...which those are pics 3 - 6....the last pic is of the card and box together...I am pretty sure she will love it.
2nd card I made it 10 X 12 and then added 1/2 " to score lines and for the top I cut it on an angle.....you can see the angle in the 4th picture....I used swissdots and swirls cuttlebug folders....added lace, ribbon, and the left over flowers off the first one....I hope all of you like these and try them yourself...very easy.
Thanks for stopping by and I hope everyone is having a wonderful night.
Tuesday, January 25, 2011
Black Magic..birdie card!
Hello again!This is my 2nd post for today...I saw this sketch at Sketches in thyme blog and wanted to make a card for their challenge....This is also my mothers birthday card...her b-day is not until March but I am caught up with birthday cards until then...
You can click on my title and it will take you too the sketches in thyme link.
Card Recipe:
I did not use any cricut..but I used a ms birdie clear stamp that I got at Walmart for 2.50..not bad huh? Well I decided to do the black magic from splitcoast stampers...@ http://www.splitcoaststampers.com/resources/tutorials/blackmagic/...this was my 1st time doing this...I think it turned out really well...Go check it out.
I used colored pencils, heating gun, ink, white gel pens, added lace, buttons, mini roses, pearl sprays, pearl pins, arygle cb folder, and used ms stitched border punch, a charm plate reads "Dream" added some brads...Hope you enjoy....Thanks for stopping by and God bless all!
Poohs Corner...Disney layout!
Hello ladies. I got my dd on the bus and wanted to share my layout with you this morning. This is my daughter Lily and my nephew Owen in Disney back in Oct 2010...I still have alot more layouts to do, I think this one turned out cute...
I used the paper that I won through Joni's blog. Thanks again Joni!
Layout recipe:
Pooh and friends cart for title
Pooh cut @ 1 1/2"
Corner cut @ 1 1/8" with marker font
Fence cut @ 2" used ds (design studio) to weld it...
sign cut @ 2"
clouds cut @ 2 1/8"
butterfly cut @ 1 1/2"
Tink and friends cart
Tree cut @ 6 1/2"
Pooh Font ....
baby pooh cut @ 3"
S cut @ 1 1/2"
BB (Birthday Bash) cartridge
Tags cut@ 3 1/2" and 1 3/4" Journaled
I used scribbles 3d iridescent gold for the honey ...I used white ink on the clouds, also cuttlebugged them with swissdots folder....corner punch for pic, brads for the tags which are journaled on.
I also used a small butterfly punch, recollections flowers (mini roses), and marcella K sticker (A Trip to Remember)...I thought it all cordinated well.
Thank you all for stopping by and checking out my blog, and maybe even becoming a new blogger friend. God Bless all!
Saturday, January 22, 2011
2nd post for today....sliding pop up cards for the girls
I'm back....I did some more sliding cards for the girls..these are what I came up with. Scroll down my blog for the boys cards. My Daughter saw that I was making these for all her cousins and she told me I have to make her one....so I am going to make another one for her even though I already made her a card..I guess I will save that one for next year.
Card Recipe:
I also used CAC for all on these too cards.
Kitty cut @ 3 1/2", inked bow and nose with purple ink...added a pearl to bow..I added some glitter hearts (stickers) had in my stash.....inside reads Your (stamped with my letter stamps) Purrfect cut @ 1" with CAC....this card is for my niece Morgan!
Poodle cut @ 3 1/2" also with CAC inked in purple ink , I added some hearts to this one too and some pearls to the bows. Inside reads : Happy Valentine's Day (stamp)
Used Sissix hearts with my Cuttlebug and popdotted and added a glitter heart to that. I think that is all for the cards...Thanks for stopping by and god bless all!
Sliding pop up cards....for the boys!
Hello ladies...Since it is a cold one out there and my hubby and daughter are playing their games. I thought I would get some crafting done. I have been seeing these cards everywhere and I wanted to try to make these so these are for Ryan (my sil's fiances son) and for my nephew Owen for Valentines Day. I really hope they like these.
Card Recipe:
Splitcoast stampers for the card dimensions....
I just got the CAC (create a critter cartridge the other day and I wanted to play) Dino 2 cut @ 3 1/2" (blue one), Dino 1 cut @ 3 1/2" with CAC
Dinomite (cut both ways) at 1 1/2" with CAC
your is stamped on with some small letter stamps that I have
Leaf (on orange dino card) cut @ 3"
all with the create a critter cart..my new fav along with Birthday Bash....thanks for stopping by and oh don't forget to scroll down for more valentine cards.
Thursday, January 20, 2011
You make my heart sing!
Hello ladies...It is alittle cold here today, but no rain or snow...until tonight...Well it is winter so I guess we can expect that. Anyway...I got my daughter Lily on the bus today and thought why not take avantage of the day..so I already got my cleaning done, and I thought why not make a card for my hubby for valentine's day. I just love how this turned out. Don't you love how you have a thought in your mind and it comes out the way you planned....cool huh?
Card recipe:
Used Sweethearts cart for the couple with the balloons cut @ 4" and pop dotted the hearts ...with a little doodling too.
The frame behind the couple is from Storybook cart cut @ 6" (accent blackout Shift E)
music notes are from Paisley cart cut @ 1" (button)
Cb "With Love" folder and ms stitched around the page border....
Inside:
Corners cut @ 2" with STory book cart
You make my heart sing with Wildcard cartridge cut @ 6" ......added some more music notes (paisley cart)and wala a Valentines cart...oh one more thing...on the frame on the outside of cart I used Argyle cb folder to emboss it.
I hope you enjoy this as much as I did making it...thanks for stopping by and God bless all!
Wednesday, January 19, 2011
Tons of love!
Hello on this wet wednesday.....It is raining alittle bit here in Pennsylvania, and later we are suppose to get some snow. So I hope everyone is staying dry and warm today. Anyway....Last night I had some time to do some crafting, my dd was playing a playstation game with my hubby. Since Valentines day is coming in a few wks, I decided to make a card for my daughter Lily. She is so into elephants...she has this big stuffed one that she takes everwhere. So this is what I came up with.
card recipe:
I used Birthday bash (my new favorite cart) for the elephant cut @ 3 1/2", tons of cut @ 1 1/4"(inside card) I added some pink glitter to the elephant and the Love...
Love was cut @ 1" with BB cart
I used george for the heart (inside)cut @ 1 1/8" added glitter too it also and wrote love with a gel pen.
I used nestabilities, ribbon, cb swissdots and paisley folders, heart punch, heart brads, doodled on elephant and used white gel pen for the tounge, brads for the eyes, and a couple clips...she loves purple and pinks so this is why I used alot of it...thanks for stopping by and God Bless all!
Tuesday, January 18, 2011
Pirate girl / Disney layout!
Hello on this icy tuesday....we got rain last night which froze once it hit the roads and sidewalks...so everything looks very pretty and shiny, but not good to drive in. Well my Daughter Lily had a 2 hr delay again today due to the weather...she is sitting here playing while I am on my computer.
Anyway. This layout is of my dd Lily at Disney in our hotel room....She was being a pirate. We went on the pirates of the caribbean ride and she loved it. She said she wants to be a pirate when she grows up..she is too cute. We saw this pirate set there and she had to have it..so this is what I came up with. Hope you like.
Layout recipe: (Sorry forgot to write down the sizes)
I used Design Studio to lay it all out.....I love that program for that...
Wheel is from Lab cart (lifes a beach)
Bird and flags are from Birthday Bash
Hat on the bird is from PDDU
Title is from Hello Kitty Font (which I got on sale for $15.00)
Bones and sculls are from Pddu cut @ 1 1/4"
used ms stitch border punch , scrapbook window embellie (won off of Joni) it is tucked behind the parrot(bird)
used black ink..tore paper and tucked pic behind it...added some lace...used a photo of the yo ho , yo ho, a pirates life for me..cut it out.
added brad to the wheel , used all dressed up dcwv paper stack....Doodled around the pirate hat on bird.
I still have to add a tag which will be tucked under the red paper for journaling....thank you for stopping by and checking my creations out....God Bless all!
Thursday, January 13, 2011
Celebrate...many wishes for a happy day!
Hello ladies..It is a really cold day. My dd had a 2 hr delay this morning, she is back at school after being sick for a couple days...she had a virus after her sinus infection. I hope she is out of the woods now with being sick. She was excited to go back to school today and so was I...that meant time for me!!!!
Anyway..my husband's birthday is coming up in a couple weeks and I thought why not make a card today...so this is what I came up with.
I used Birthday Bash for all of it....
Candle 1 cut @ 2 1/4" twice..and pop dotted
Confetti (from the lion on BB cart) cut @ 6"
Many wishes for a Happy Day cut @ 1 3/4"
Candle 1 cut @ 1 1/2" inside the card
I used ms bubble around the page border, Scrappy cat clear stamp for Celebrate, Aleenes paper glaze over the candles so they look like wax.....I also used nestabilities, and some gel pens on the confetti...
Thank you for stopping by and God bless all!
Tuesday, January 11, 2011
Can you dig it / Disney layout!
Hello ladies! This is my 2nd post today, 1st post was a blog candy that I won back in December....This layout is of my dd Lillian 5 years old..All of my blogger friends know by now that back in October we went to Disney..She got to dig up bones at the TREX Cafe in their bone yard...she had a blast. She was so cute ..she would put her toes in the sand run them along the sand and say I found another one!
Anyway..here is the recipe for this layout..very simple.
C cut @ 1 1/2" with Birthday Bash (one of my fav carts that I just got)
an cut @ 1" also with BB
you cut @ .3/4"
DIG cut @ 1 1/2"
it cut @ 1" also with the same cart
Exclamation mark cut @ 1" with BB
Stars cut @ 1, 2, and 3 " with George and basic shapes
used white marker to accent the stars, used some ink (red and orange) on the journaling (on star), very simple layout..oh I already mentioned that...
Thanks for stopping by and taking the time to check out my creations...maybe even follow...God Bless all!
Received blog candy!
Hello ladies...Back in December I won a blog hop from Joni @ http://joniparkerstuff.blogspot.com/ ...go check her out..she has some awesome creations...very talented. I received this package yesterday could not wait to open it...I got some awesome paper, tags, embellies and more paper..cool huh?
Thank you again Joni!!!!!! It was worth the wait.
Monday, January 10, 2011
Snowflakes and blossoms!
Hello ladies! This card is for my mil's birthday for next wk.....I used a sugar nellie stamp which I colored with colored pencils and mineral spirits..added some twinkle craft glitter to the stamp...used nestabilities, some snowflake buttons..some pins, flowers (stash), ribbon, and the winter woodland cart for the snowflakes.....I think that is all.....Thanks for stopping by and God bless all!
Wednesday, January 5, 2011
A prayer for you / Get well Card!
Hello ladies...this is my 2nd post for today...I had to get this card done tonight..going to see my aunt in the hospital tomorrow..We all found out that she has cancer (in her neck) back in November 2010 , she is having surgery tomorrow and I wanted to make her this to cheer her up...
Card Recipe:
Used Simply Sweet cart ....cut get well soon @ 1 1/2"
added flowers (stash) , gold ribbon, jems,pearl pins, inked with distress ink tea dye...colored magnolia stamp with colored pencils and mineral spirits to blend the colors...
I used Cuttlebug paisley, gel pens for the hearts on the girls dress, nestabilities (scallop oval), ms stitched border around the page....last but not least a corner punch, glitter twinkle writer, and hand drew the halo ....
Inside:
Reads "We are praying for you", jems and ms stitched around the page border.
Thanks for stopping by and God Bless all!
My precious princess / yes another disney layout!
Hello ladies....The other day I told all my blogger friends and family about my daughter Lillian....how she had chest xrays and xrays of her sinuses....well her Test came back Normal...the doctor said it is a upper respitory infection..basically because of her allergies and sinuses...so I have to give her claritin...she is doing alot better today..no headache ..still coughing but better...thank all of you for all your prayers.
Now onto my layout..this is another layout of my dd Lily in October 2010...we all went to Disney..this was downtown disney where all the shopping is. We were walking by these statues and she said mommy you have to take my picture with those. So I did and I made a 2 pg layout with it...I am so pleased with this one. I haven't done 2 pagers in a while...
Layout recipe:
My cut @ 1" with Tear Drop cartridge
Precious cut @ 2" (square) with tear drop
P cut @ 2" (princess) with tear drop
rincess cut @ 1 1/2" with tear drop
swirls cut @ 1 3/4" twice with Home Decor
Used a carriage charm, brad, ribbon which I got in Disney for $1 (border at the top)
I used cuttlebugged with paisley folder
added some flowers (which I found on sale at Michaels)
added jems, used nestabilities for the journaling (under picture)
Used ms stitched around the page border....I think that is all...very simple.
I think this year is starting off simple...gotta get alot done.
thank you all for stopping by and God Bless everyone!
Monday, January 3, 2011
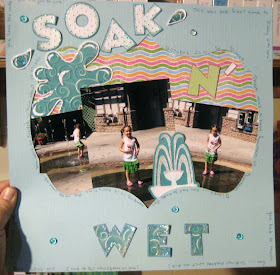
1st post of the new year....Soak N' Wet / disney layout!
Hello ladies...I hope everyone is having a great new year...ours is starting off alittle rough. My dd Lily has been sick with sinus infections since we got back from Disney in October...she can't seem to shake it..she has had 2 antibiotics and she just finished one in Dec. Now today I took her back to the doctors to find out what she has agian...they sent her for xrays...still waiting on that..so say a little prayer that everything is normal.
Well anyway this is my 1st post for the new year....started off with a simple layout....This is a layout of my daughter Lily in Downtown Disney playing in the big water fountain...well you stand on it and it shoots the water at you..she loved it...her daddy captured these pics while I was shopping....she loves anything to do with water..what kid doesn't! She was soak N' Wet....this is where I got the title.
Layout recipe:
Soak cut @ 1 1/2" with Mickey Font...added some crystal craft twinkles writer to the title and the waterfountain to give it that water glossy feel.
Wet cut @ 1 1/2" with Mickey Font
N' Cut also @ 1 1/2" with MF
waterfountain cut @ 4" with DCT (dreams come true cart)
I used white and light blue ink on title and waterfountain
Used CB swirls and swissdots ...added some skittles to look like water drops...journaled around the page ...background was cut before for my HOBO page back in 2010...used the scrap page.
THanks for stopping by and God Bless all in the New year!
Splash (water) cut @ 3 1/2" with DCT